
Part 2 of this tutorial is available here.
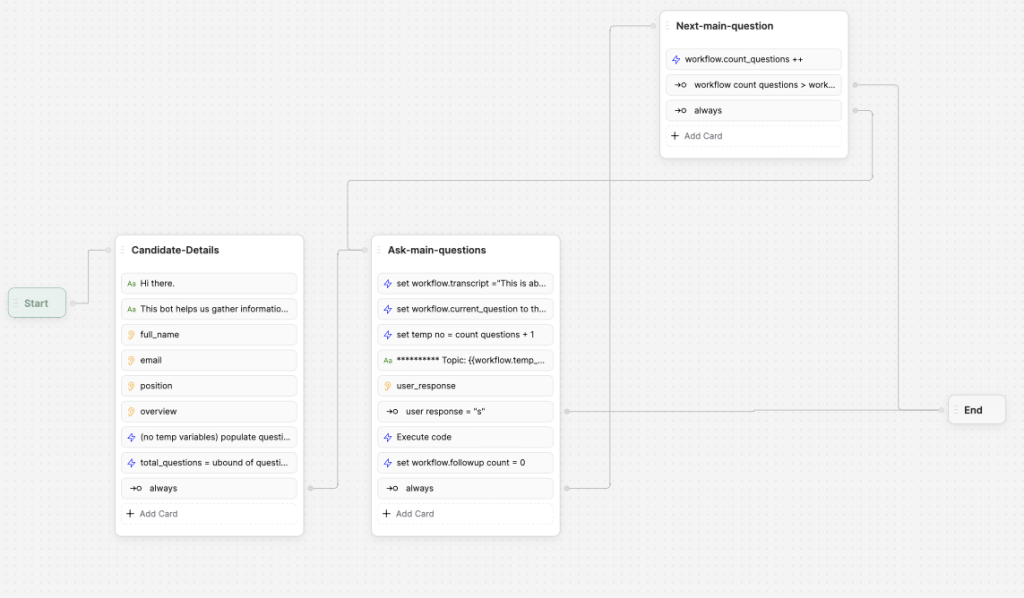
We have now 3 nodes. Node 1 “Candidate-Details” collects basic information about a candidate and prepares a set of pre-defined questions. Node 2 “Ask-main-questions” goes through the main questions prepared in node 1. Node 3 acts as a loop block for node 2 and makes sure we go through all the prepared questions.
The issue last time was that due to the logic implemented in the main template we don’t store answers to main questions.
In this tutorial we will implement a new node which will utilize AI to summarise answers and rate them.
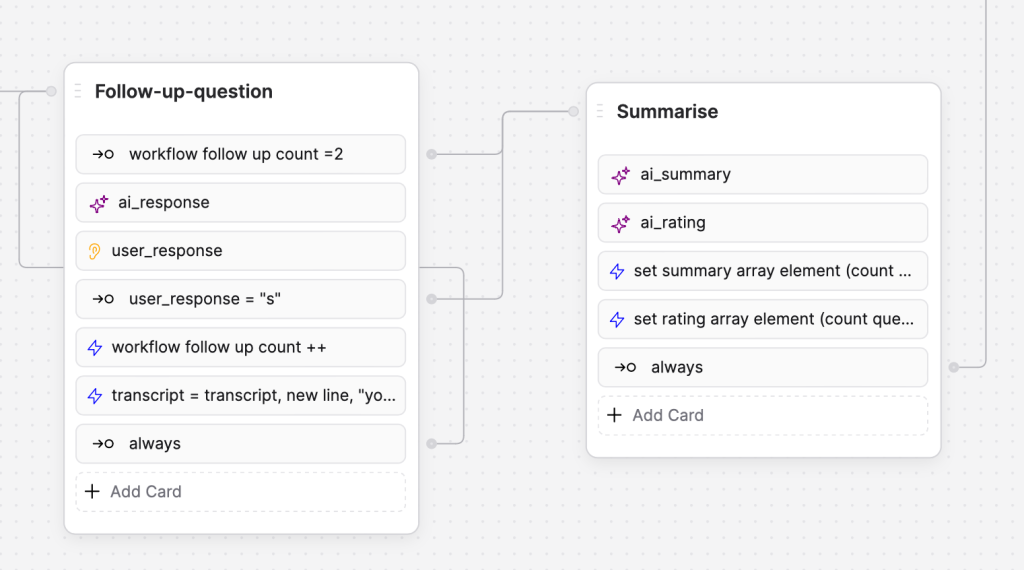
In the original template a “Follow-up-question” node is implemented befor “Summarise” node. Here i will add “Follow-up-node” but leave it empy for a while and I will concentrate on “Summarise” node.
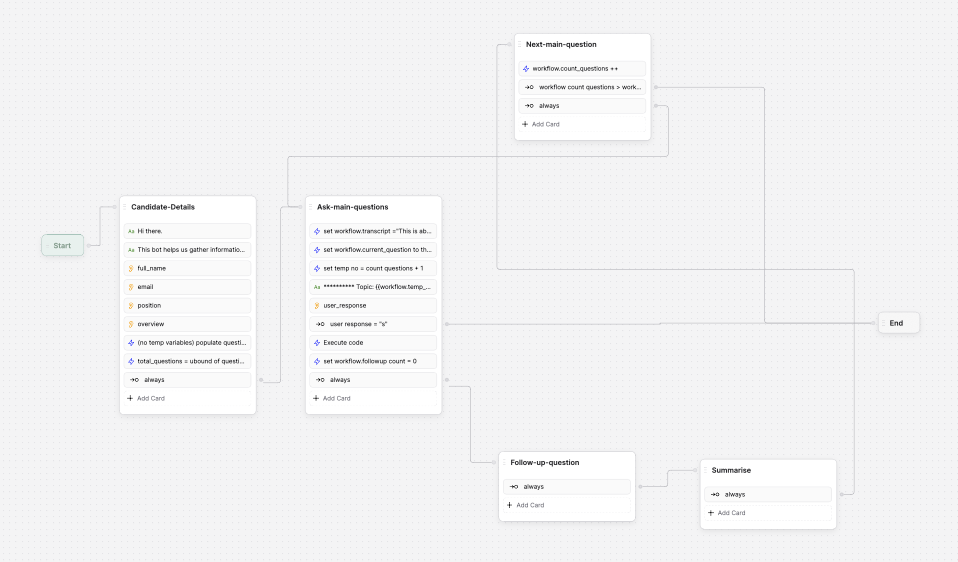
Now the Workflow looks like this. And has the following logic.

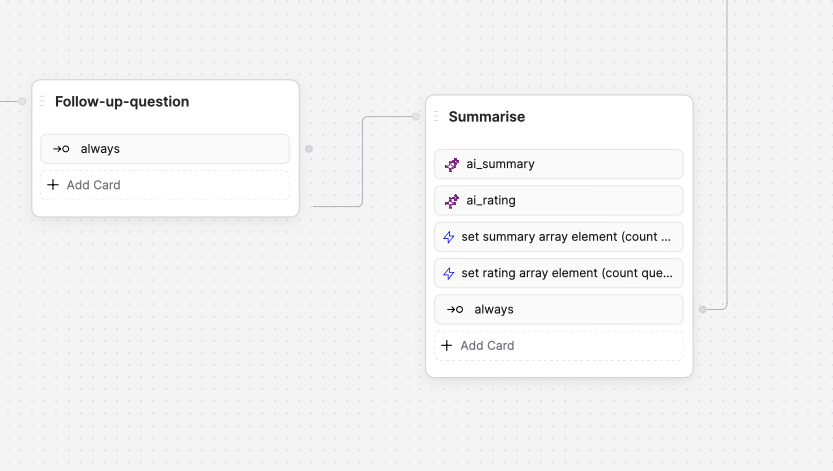
Edit “Summarise” node
- In the ‘Main Workflow Properties’ click ‘+ variable’. In the variable settings choose ‘Type’: String, ‘Name’: ai_summary, and click ‘Add’ button.
- From the toolbox select ‘AI Task’ card and drag it to the node. Click on newly added ‘AI Task’ card. On the right side in the card’s settings menu enter the following in the ‘Task Instructions’ box:
Summarize the transcript below in two sentences for a potential investor in the company. End each summary with an assesment of the candidates answer. Put your summary in ai_summary.
I was expecting it to automatically fill in all other fields, but in my case nothing happened. So I copied the following text to ‘AI Task Input’ box:
The user is applying {{workflow.position}} at your company. Summarize the information they gave you in two sentences, including an assessment of the candidates answer, and put the summary in ai_summary.
<transcript>
{{workflow.transcript}}
</transcript>
Then in the field ‘Store results in variable’ choose workflow.ai_summary. - In the ‘Main Workflow Properties’ click ‘+ variable’. In the variable settings choose ‘Type’: Number, ‘Name’: ai_rating, and click ‘Add’ button.
- From the toolbox select ‘AI Task’ card and drag it to the node. Click on newly added ‘AI Task’ card. On the right side in the card’s settings menu enter the following in the ‘Task Instructions’ box:
You are a star recruitment analyst. Rate out of 10 how likely it would be that you would hire the candidate based on their answers overall to the questions . Put your rating in ai_rating.
Copy the following text to ‘AI Task Input’ box:
The following is a transcript between you and the candidate.
<transcript>
{{workflow.transcript}}
</transcript>
Then in the field ‘Store results in variable’ choose workflow.ai_rating. - In the ‘Main Workflow Properties’ click ‘+ variable’. In the variable settings choose ‘Type’: Array, ‘Name’: summary, ‘Array type’: String and click ‘Add’ button.
- From the toolbox select ‘Execute code’ card and drag it to the node. Click on newly added ‘Execute code’ card. On the right side in the card’s settings menu enter the following command in the field ‘Generate code’:
set summary array element (count questions) = ai_summary
This will generate the following code:workflow.summary[workflow.count_questions] = workflow.ai_summary; - In the ‘Main Workflow Properties’ click ‘+ variable’. In the variable settings choose ‘Type’: Array, ‘Name’: answer_rating, ‘Array type’: String and click ‘Add’ button.
- From the toolbox select ‘Execute code’ card and drag it to the node. Click on newly added ‘Execute code’ card. On the right side in the card’s settings menu enter the following command in the field ‘Generate code’:
set rating array element (count questions) = ai rating
This will generate the following code:workflow.answer_rating[workflow.count_questions] = workflow.ai_rating;
Now the “Summarise” node is ready. One way to test it would be to check out arrays workflow.summary and workflow.answer_rating in the Event Debugger after running the chatbot.

As you can see I have 3 values in the workflow.answer_rating array, I managed to score 9.5 for all the questions. I also have 3 values in the workflow.summary array. AI summarised and evaluated each answer I provided.
Editing “Follow-up question” node
Now we can make things more interesting and aks AI to aks the user more questions based on the provided answers.
The logis is following. In “Ask-main-question” we start a new topic by asking one of the main questions. Then based on the answer provided AI can proceed on its own with more follow up questions in “Follow-up-question” node until user enters “s” or if AI asks more than 2 questions.
- To restrain AI asking more than 2 follow up questions let’s add a condition. From the toolbox select ‘Expression’ card and drag it to the node. Click on newly added ‘Expression’ card. On the right side in the card’s settings menu enter the following command in the field ‘Label’:
workflow follow up count =2
This shouls generate the following code:workflow.follow_up_count === 2
This logic should prevent AI from asking more than 2 follow up questions. Let’s connect it to the “Summarise” node. - Next we add a variable to save AI response. In the ‘Main Workflow Properties’ click ‘+ variable’. In the variable settings choose ‘Type’: String, ‘Name’: ai_response, and click ‘Add’ button.
- Now we can ask AI to generate a question. From the toolbox select ‘AI Task’ card and drag it to the node. Click on newly added ‘AI Task’ card. On the right side in the card’s settings menu enter the following in the ‘Task Instructions’ box:
You are a skeptical and brilliant recruiter questioning a candidate for a role at your company. Your job is to reveal the strengths and weaknesses of the candidate. Using the STAR method, what is the most insightful follow up question you could ask them at this point in response to their answer in the last line of the transcript, paying particular attention to what the question at the start of the transcript is trying to probe? Put your follow up question in ai_reponse.
Copy the following text to ‘AI Task Input’ box:
What is your follow up question (put it in ai_response) to the candidate applying for {{workflow.position}}? This is the overview of the candidate: {{workflow.overview}}
{{workflow.transcript}}
Then in the field ‘Store results in variable’ choose workflow.ai_response.. - Now we can aks the user AI generated question which is stored in workflow.ai_response variable. From the toolbox select ‘Raw Input’ card and drag it to the node. On the right side in the card’s settings menu enter the following text in the field ‘Question to ask the user’:
{{ workflow.ai_response }} (type “s” to skip)
Under ‘store results in’ choose the variable user_response. - Next we add a way for the user to stop AI asking any more questions. From the toolbox select ‘Expression’ card and drag it to the node. Click on newly added ‘Expression’ card. On the right side in the card’s settings menu enter the following command in the field ‘Label’:
user_response = “s”
This shouls generate the following code:workflow.user_response === 's'
Let’s connect it to the “Summarise” node. - Then let’s increase the number of the follow up question. From the toolbox select ‘Execute code’ card and drag it to the node. Click on newly added ‘Execute code’ card. On the right side in the card’s settings menu enter the following command in the field ‘Generate code’:
workflow follow up count ++
This will generate the following code:workflow.follow_up_count++ - The last thing is to add AI’s question and user’s response to the workflow.transcript variable. From the toolbox select ‘Execute code’ card and drag it to the node. Click on newly added ‘Execute code’ card. On the right side in the card’s settings menu enter the following command in the field ‘Generate code’:
transcript = transcript, new line, “you:” current question, new line, “user:”, user response
This text from the template did not generate any meaningful code for me, so I just copied the following code to the ‘Code’ field:workflow.transcript += `\nYou: ${workflow.current_question}\nUser: ${workflow.user_response}` - Make sure the last expression card which is set to always is connected to the beginning of the ‘Follow-up-question’ node.
Now things should look like on the image below. AI follows up the main question with a couple of additional questions of its own. If the number of additional questions exceeds 2, we processd to Summarise node. If user enters “s” for a reply, we proceed to Summarise node.
Testing the chatbot
On this stage of the developent one way to test the chatbot would be to run it and check Event Debugger. Now when you run the chatbot you will notice you have to answer additional questions which were generated by AI.
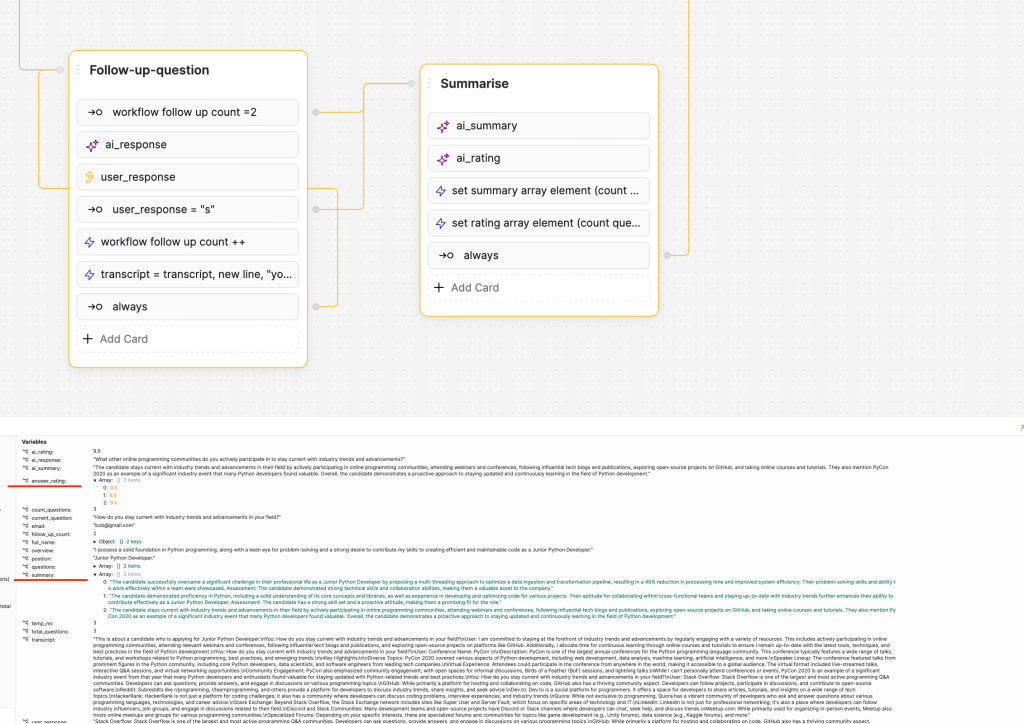
It seems to be working fine. In the end summary and rating for each topic was stored.
Resetting variables
In the original template, the variables workflow.summary and workflow.answer_rating are reset just after the chat flow starts in the ‘Candidate-Details’ node. This is perhaps done so that when the user starts a new chat, the summary and rating are reset. I tested the chatbot without explicitly resetting those variables, and they were automatically reset each time I started a new chat. However, to avoid any potential bugs, I decided to add an explicit reset of those variables to the ‘Candidate-Details’ node.
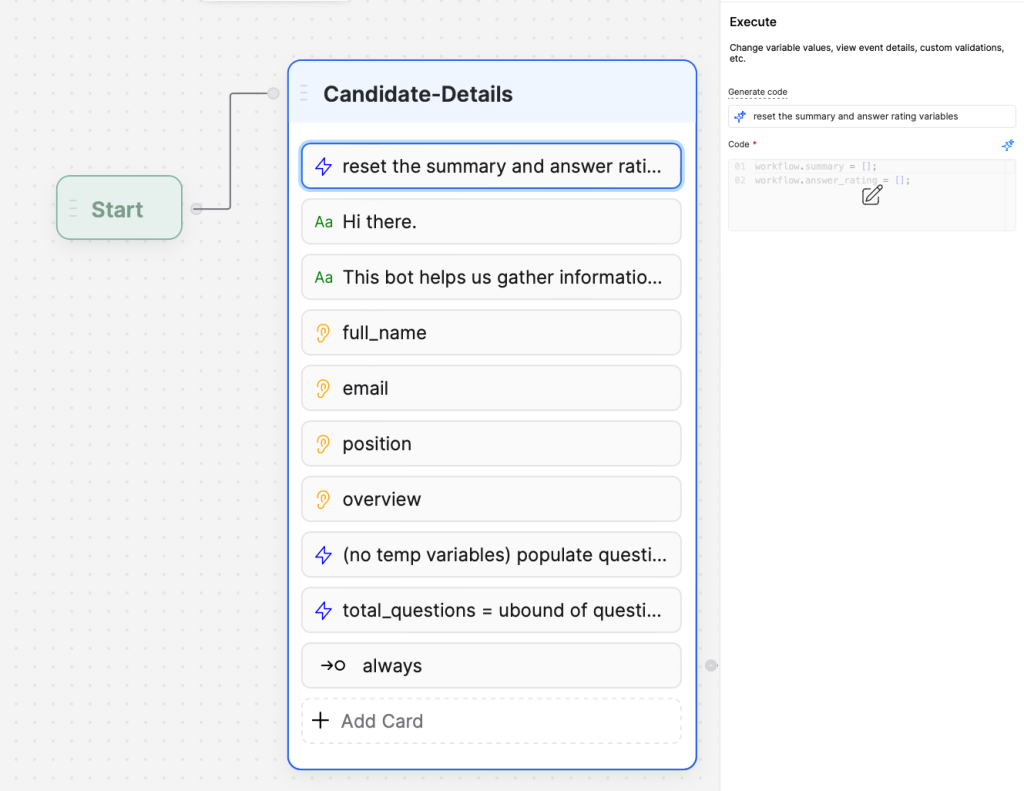
From the toolbox select ‘Execute code’ card and drag it to the node. Click on newly added ‘Execute code’ card. On the right side in the card’s settings menu enter the following command in the field ‘Generate code’:
reset the summary and answer rating variables
This will generate the following code:
workflow.summary = []; // reset the summary variable
workflow.answer_rating = []; // reset the answer rating variable
Leave a Reply
You must be logged in to post a comment.