
Part 1 of this tutorial is available here.
Editing the 2nd node
In part 1 of this tutorial we created the 1st node “Candidate-Details” which greets a new user, collects its full name, email address, position the user is wishing to apply for as well as user’s experince and capabilities. It stores all the data into the designated variables. It also stores any questions we would like to ask the user later into an array.
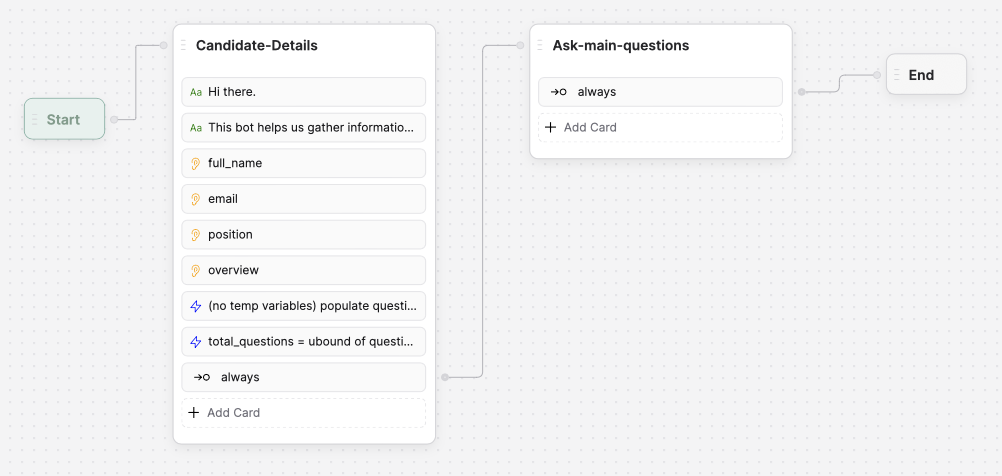
Now we need to add a second node and name it ‘Ask-main-questions’. This node will iterate through the questions we prepared in the 1st node and it will record answers.
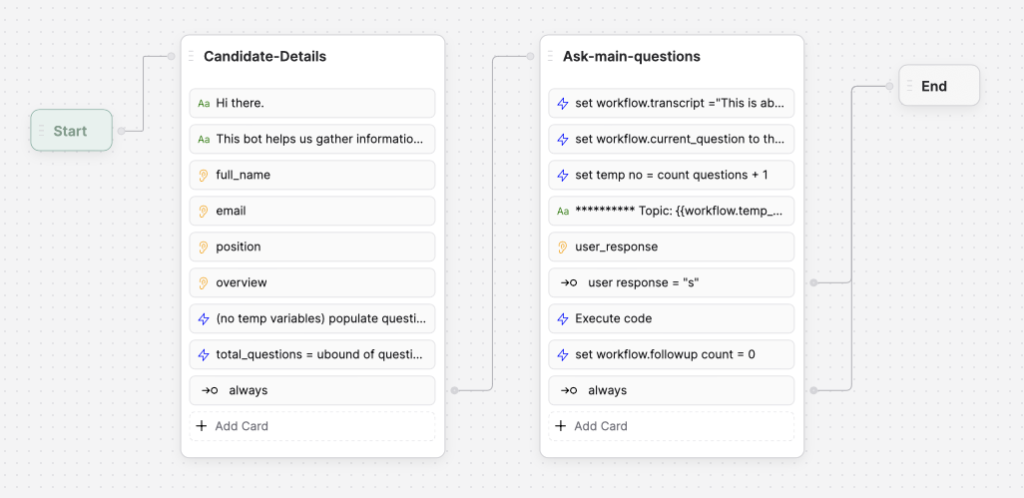
Then let’s add to the 2nd node all the necessary cards and variables.
- In the ‘Main Workflow Properties’ click ‘+ variable’. In the variable settings choose ‘Type’: String, ‘Name’: transcript, and click ‘Add’ button.
- From the toolbox select ‘Execute code’ card and drag it to the node. Click on newly added ‘Execute code’ card. On the right side in the card’s settings menu enter the following command in the field ‘Generate code’: “set workflow.transcript =”This is about a candidate who is applying for” workflow.position”. This will generate the following code:
workflow.transcript = 'This is about a candidate who is applying for ${workflow.position}'; - In the ‘Main Workflow Properties’ click ‘+ variable’. In the variable settings choose ‘Type’: String, ‘Name’: current_question, and click ‘Add’ button.
- In the ‘Main Workflow Properties’ click ‘+ variable’. In the variable settings choose ‘Type’: Number, ‘Name’: count_questions, and click ‘Add’ button.
- From the toolbox select ‘Execute code’ card and drag it to the node. Click on newly added ‘Execute code’ card. On the right side in the card’s settings menu enter the following command in the field ‘Generate code’: “set workflow.current_question to the variable count_questions element in the questions array (no temp variables)”. This will generate the following code:
workflow.current_question = workflow.questions[workflow.count_questions]; - In the ‘Main Workflow Properties’ click ‘+ variable’. In the variable settings choose ‘Type’: Number, ‘Name’: temp_no, and click ‘Add’ button.
- From the toolbox select ‘Execute code’ card and drag it to the node. Click on newly added ‘Execute code’ card. On the right side in the card’s settings menu enter the following command in the field ‘Generate code’: “set temp no = count questions + 1″. This will generate the following code:
workflow.temp_no = workflow.count_questions + 1; - From the toolbox select ‘Text’ card and drag it to the node. On the right side in the card’s settings menu enter the following text in the field ‘Message to send’: “********** Topic: {{workflow.temp_no }} of {{workflow.total_questions}} **********”.
- In the ‘Main Workflow Properties’ click ‘+ variable’. In the variable settings choose ‘Type’: String, ‘Name’: user_response, and click ‘Add’ button.
- From the toolbox select ‘Raw Input’ card and drag it to the node.
On the right side in the card’s settings menu enter the following text in the field ‘Question to ask the user’: “{{workflow.current_question}} (type “s” to skip to next)”. Under ‘store results in’ create a variable user_response. - From the toolbox select ‘Expression’ card and drag it to the node. Click on newly added ‘Expression’ card. On the right side in the card’s settings menu enter the following command in the field ‘Label’: user response = “s”. This shouls generate the following code:
workflow.user_response === 's'
This logic should prevent the chatbot of asking any further questions. At the moment let’s connect it to the end node. - From the toolbox select ‘Execute code’ card and drag it to the node. Click on newly added ‘Execute code’ card. In the original template the following line of text is provided in the ‘Generate code’ box: transcript = transcript, new line, “you:” current question, new line, “user:”, user response. And the following code is generated:
workflow.transcript += `\nYou: ${workflow.current_question}\nUser: ${workflow.user_response}`
However in my case it did not work, so I just copied the code. - In the ‘Main Workflow Properties’ click ‘+ variable’. In the variable settings choose ‘Type’: Number, ‘Name’: follow_up_count, and click ‘Add’ button.
- From the toolbox select ‘Execute code’ card and drag it to the node. Click on newly added ‘Execute code’ card. In the original template the following line of text is provided in the ‘Generate code’ box: set workflow.followup count = 0. This will generate the following code:
workflow.follow_up_count = 0;
Now we have all the necessary cards in node 2. The node will set up initial variables and ask for the first question in the list, however to go through all the questions we would need to implement a loop.
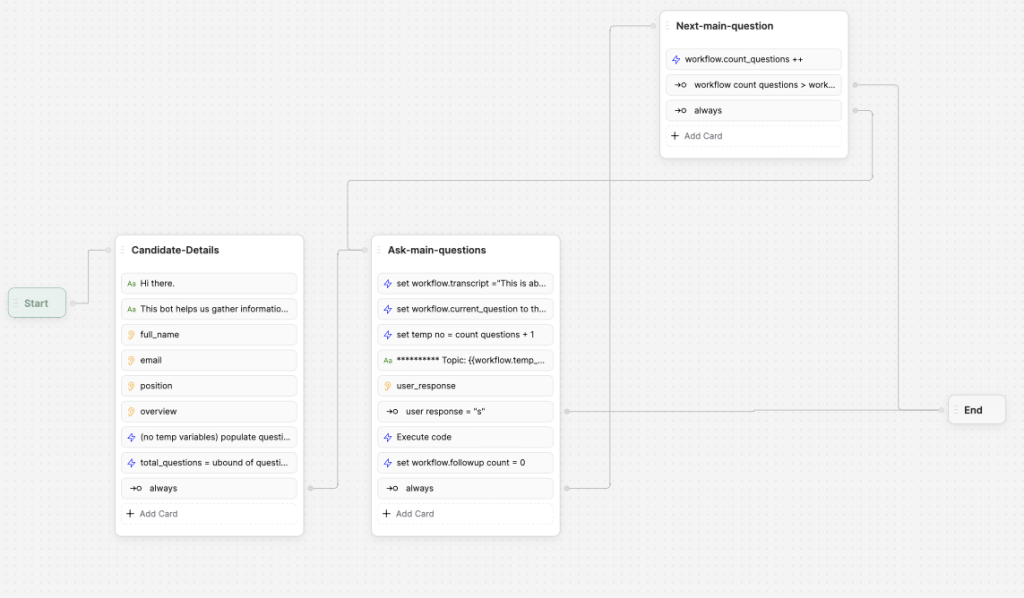
Adding a 3rd node to loop through the questions
- First, we need to increase the number of current question. From the toolbox select ‘Execute code’ card and drag it to the node. Click on newly added ‘Execute code’ card. In the original template the following line of text is provided in the ‘Generate code’ box: workflow.count_questions ++. This shouls generate the following code:
workflow.count_questions++; - Then we need to check whether we went through all the questions. If we did we transistion to the end node. From the toolbox select ‘Expression’ card and drag it to the node. Click on newly added ‘Expression’ card. On the right side in the card’s settings menu enter the following command in the field ‘Label’: count questions > workflow total questions -1. This will generate the following condition:
workflow.count_questions > workflow.total_questions - 1
Connect this card to the end node. - If previous condition is not met, meaning we still have questions to ask, we should transition back to the 2nd node. From the toolbox select ‘Expression’ card and drag it to the node. Connect this card to the 2nd node.
Testing the chatbot
Now this part of the chatbot is ready to be tested. The bot will collect all the essential information and go through 3 questions we prepared in advance. It will also stop asking questions if the user enters “s”.
Afrer testing the bot and printing out all the variables I realised that the 2nd node “Ask-main-questions” renews workflow.transcript variable every time it starts. So, at the moment only a reply to the last question is stored. This is because in the template i’m going through there is a logic which summarises and evaluates answers to main questions separately and stores evaluation data to another variable, not storing user’s original answers. I will deal with this logic in part 3 of this tutorial.
Leave a Reply
You must be logged in to post a comment.